Overview
Dashboard Is Information Management Tool That Visualizes The Important Metrics In The Software Here The Dashboard To Monitor And Control The Each Of The Areas And Process Of The Organization. Vaales Hrm Provides The Insights Of Information From Hr Point Of View. The Dashboard Is Dynamic In Nature That Is The Metric Changes With The User And Their Permission Set By The Admin. Here Dashboards Consist Of The Following Metrics
- Total Projects: Provides The Information Of Total Projects Dealing By The Organization. Clicking On It Will Navigate To That Particular Module Or Function
- About To Expire: Provides Information Regarding The Documents Which Is About To Expire In The Organization Which Has Been Already Uploaded Or Documented. Clicking On It Will Navigate To That Particular Module Or Function.
- Leave Request: Provides The Information Regarding The Leave Request Made By The Employees In The Organization. Clicking On It Will Navigate To That Particular Module Or Function.
- Loan Request: Provides The Information Regarding The Loan Request Made By The Employees In The Organization. Clicking On It Will Navigate To That Particular Module Or Function.
- Travel Request: Provides The Information Regarding The Travel Request Made By The Employees In The Organization. Clicking On It Will Navigate To That Particular Module Or Function.
- Active Projects: Provides The Information Regarding The Active Projects That The Organization Deals With. Clicking On It Will Navigate To That Particular Module Or Function.
- Daily Attendance Verify: Provide The Insights Of Employee’s Attendance On The Basis Of Day. Capturing Information Like In Time And Out Time Of Them.
Overview
Customer Relationship Management Manages The Customers Of The Organization Associated With. This Functionality Has The Details And Other Relevant Parameters Based On The Customer Interaction.
Customer Profile:
Contains The Basic Data And Information Of The Customer.
| Mandatory Fields | Description |
| Name | Customer Name |
| Mobile Number | Customer Contact Mobile Number |
| Non-Mandatory Fields | |
| Contact Email | |
| Company Email | |
| Contact Mobile | |
| Contact Person | |
| Country | |
| State | |
| Address | |
| Pincode | |
| Fax | |
| Website | |
| Description |
How To Add Customer:
Login To Application -> Click On Crm Module -> Click On Customer -> Fill The Mandatory Fields -> Save
Overview
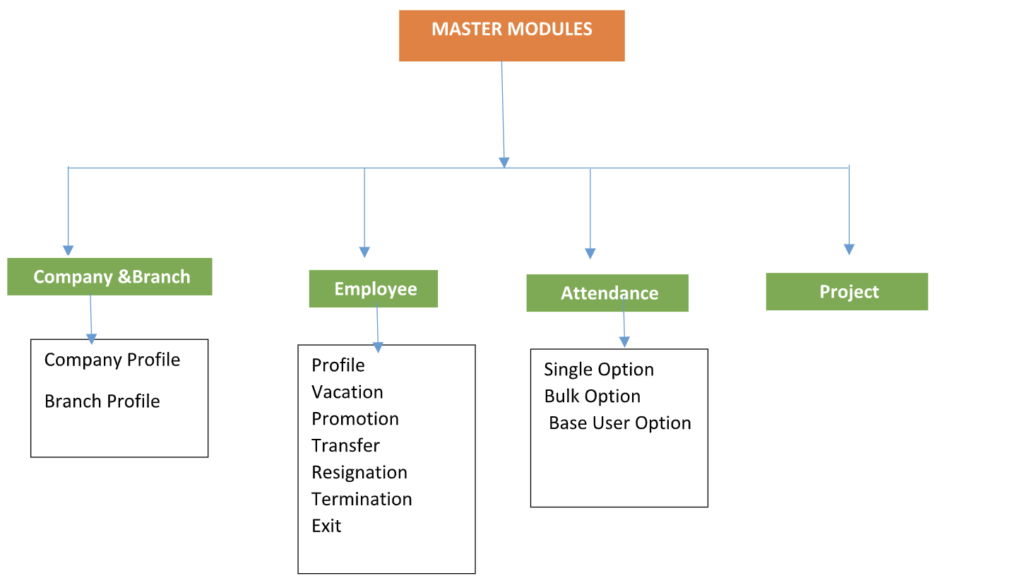
Company & Branch
Company Profile
Company Profile Is The Functionality Where The User Can Enter The Relevant Data And Information Like Name, Address, Contact Numbers, Email, Website And Also Can Upload Relevant Documents Related To The Company. Company Profile Captures Whole The Basic And Relevant Information Of The Organization The Software Is Operates. There Are Mandatory As Well As Non-Mandatory Fields To Fill Which Includes. Search and filter option is also there in this functionality for easy access to specific data.
| Mandatory Fields | Description |
| Company Name | Name Of The Organization |
| State | Provide State Of Organization Headquartered |
| City | City Of Organization Headquarters |
| Official Email Of The Company | |
| Mobile Number | Official Mobile Number Of Company |
| Country | Country Of The Organization |
| Address | Registered Address |
| Document Type | The Official Documents Prevailing In The Organization Based On Their Business And Process |
| Document Number | The Registered Number Of The Particular Documents That Organization Uploading In The Platform |
| Issue Date | The Date In Which The Document Is Issued Or Introduced. |
| Expiry Date | The Expiry Date Of The Documents Which Has Been Uploaded |
| Document Upload | The Field Where The User Can Upload The Relevant Document To The Software |
| Non-Mandatory Fields | |
| Initial | If The Company Have Additional Name |
| Post Box | Post Box Of Organization |
| Pin Code | Pin Code Of Organization |
| Phone Number | Landline Number Of Organization |
| Registration Number | The Organization Registration Number |
| Website | The Url Of Company Website |
| Contact Mobile | If The Organization Have Contact Person Number |
| Document Description | The Descriptions About The Documents Uploaded |
Creating Company Profile:
Click on master -> click on company and branch -> click on company -> click on add new -> enter the mandatory fields -> save.
Branch Profile :
Company Have Branches Situated In One More Locations Here The User Can Add The Branch Information Like Name, Address, Contact Number, Email, Website And So On. In This Function They Can Also Upload Branch Related Company Documents, Which Can Be Specifically for That Particular Branch Which Can Be Any Sort Of Document Which Been Already Created In The Document Type Menu. Search and filter option is also there in this functionality for easy access to specific data
| Mandatory Fields | Description |
| Branch Name | Name Of The Branch |
| Country | Country In Which Branch Operates |
| City | City The Branch Operates |
| Official Email Of Branch | |
| Mobile Number | Official Mobile Number Of Company |
| Currency | The Currency That Particular Branch Deals With |
| Currency Decimal | |
| Minimum Shift Hours | |
| Address | Registered Address |
| Document Type | The Official Documents Prevailing In The Branch Based On Their Business Operations |
| Document Number | The Registered Number Of The Particular Documents That Organization Uploading In The Platform |
| Issue Date | The Date In Which The Document Is Issued Or Introduced. |
| Expiry Date | The Expiry Date Of The Documents Which Has Been Uploaded |
| Document Upload | The Field Where The User Can Upload The Relevant Document To The Software |
| Non-Mandatory Fields | |
| Initial | If The Company Have Additional Name |
| Post Box | Post Box Of Organization |
| Pin Code | Pin Code Of Organization |
| Phone Number | Landline Number Of Organization |
| Registration Number | The Organization Registration Number |
| Website | The Url Of Company Website |
| Contact Mobile | If The Organization Have Contact Person Number |
| Document Description | The Descriptions About The Documents Uploaded |
| State | State In Which The Branch Operates |
How To Add Branch Profile:
Click On Master -> Click On Branch -> Click On Branch Profile -> Click On Add New Button -> Fill The Mandatory In Basic Details -> Navigate To Document Upload Page -> Fill The Mandatory Information And Upload Document -> Save
Employee
This is the master module of employee where it contains all the information of employees in the organization
1. Employee Profile
This is the functionality to enter and do employee profiling by providing basic details and other relevant information. Search and filter option is also there in this functionality for easy access to specific data
| Mandatory Fields | Description |
| Branch | Name Of The Branch |
| Title | Providing the title ( Mr / Mrs.) |
| First Name | First name of employee |
| Last Name | Last Name of employee |
| Gender | Select the gender |
| Marital status | To select the marital status |
| Date Of Birth | Providing date of birth |
| Employee Category | Whether the employee belong to which category or division as per the organization defines |
| Date of joining | The date in which employee joined |
| Employee Designation | The designation of employee which can be selected |
| Type | The employee belongs to Hourly of monthly salary basis |
| Nationality | Providing the nationality of employee |
| Employee login Option | Whether the employee have the privilege to login to the software can be assigned here |
| Mobile Number | Providing the mobile number of employee |
| Select Country of residential Address | Provide the country for residential address |
| residential Address | Provide residential address |
| Select country for passport address | Provide the country for passport address |
| Passport address | Provide passport address |
| Non-Mandatory Fields | |
| Middle name | |
| Reference Number | The reference number of employee if any |
| Company Email | Providing email given by company |
| Date of arrival | The date in which employee arrived at office |
| Induction date | The date in which employee had the induction program before starting the work |
| Medical date | |
| Pay grade | The salary level of employee |
| Office shift | Which working shift the employee belongs to |
| Basic Salary | The predefined basic salary offered to employee |
| Recruiter | The employer who recruited the employee |
| Reporting To | The person concern whom the employee needs to report |
| Personal Email | Personal email id of employee |
| State | Providing state for both residential and passport address |
2. Employee Vacation
This functionality is for to fix the vacation period of each employees as per defined by the organization. Search and filter option is also there in this functionality for easy access to specific data
| Mandatory Fields | Descriptions |
| Select Employee | The employee in which the vacation need to incorporated |
| Start Date | The day and date in which the vacation starts for that employee |
| End Date | The day and date in which the vacation ends |
How to add employee vacation:
Click on master -> Click on employee -> click on vacation -> click on add new -> enter the mandatory fields -> save.
3. Employee Promotion
This is the functionality to enter an employee promotion details from one designation to others.
| Mandatory Fields | Descriptions |
| Select Branch | The branch in which employee is working |
| Employee | Employee name |
| Current Designation | Auto generated as per the employee current details |
| Current Grade | Auto generated as per the employee current details |
| New Designation | Enter the new designation |
| New Grade | Enter the new grade |
| Promotion Title | The name of the promotion |
| Promotion Date | The date in which the employee got promoted |
| Non-Mandatory Fields | |
| Description |
How to add employee promotion:
Click on master -> Click on employee -> click on promotion -> click on add new -> enter the mandatory fields -> save.
4. Transfer
This is the functionality to enter the information regarding employee transfer from one branch or department to another. Search and filter option is also there in this functionality for easy access to specific data
| Mandatory Fields | Descriptions |
| Employee | Employee name |
| Transfer Date | The date in which the employee is getting transferred |
| Transfer from Branch | Auto generated as per the employee current details |
| Transfer to branch | The branch in which the employee getting transferred |
| Select Department | Enter the department where the employee is getting transferred |
| Description | Provide any descriptions regarding it |
| Non-Mandatory Fields | |
| Upload Documents | Can upload documents if anything related to employee transfer |
How to add employee transfer:
Click on master -> Click on employee -> click on transfer -> click on add new -> enter the mandatory fields -> save.
5. Employee Resignation
This is the functionality to enter the information regarding employee resignation from the organization. Search and filter option is also there in this functionality for easy access to specific data
| Mandatory Fields | Descriptions |
| Branch | Select the branch in which employee works |
| Employee | Employee name |
| Reporting To | The person concern to which the employee is reporting |
| Notice Date | The date in which notice period starts |
| Resignation Date | The date in which employee is resigning |
| Reason | Reason for resignation |
| Upload Documents | Upload all relevant documents included in the process of resignation |
How to do employee resignation:
Click on master -> Click on employee -> click on resignation -> click on add new -> enter the mandatory fields -> save.
6. Employee Termination
This is the functionality to enter the information regarding employee termination from the organization. Search and filter option is also there in this functionality for easy access to specific data
| Mandatory Fields | Descriptions |
| Branch | Select the branch in which employee works |
| Employee | Employee name |
| Notice Date | The date in which notice period starts |
| Termination Date | The date in which employee is being terminated |
| Reason | Reason for terminated |
| Upload Documents | Upload all relevant documents included in the process of resignation |
How to add employee termination:
Click on master -> Click on employee -> click on termination -> click on add new -> enter the mandatory fields -> save.
7. Employee Exit
This the functionality to add the information regarding employee exit that is the process final settlement done by the employer from the organization. Search and filter option is also there in this functionality for easy access to specific data
| Mandatory Fields | Descriptions |
| Employee | Employee name |
| Exit Date | The date in which employee is leaving the company |
| Exit Type | The type whether it’s a resignation/Termination or any other means |
| Is Gratuity Paid | Did the settlement of gratuity done or not can be checked here |
| Description | Add any description |
| Is Due | Add any dues in document or salary etc. can be entered here |
| Due Description | If there is anything Due from the employee the description will be added here. |
How to add employee Exit:
Click on master -> Click on employee -> click on exit -> click on add new -> Enter the mandatory fields -> Check the gratuity/Due option -> save.
Attendance
This functionality provides and adds information regarding the attendance of single or whole employees working in the organization.
1. Single Option
The attendance details of one particular employee can be listed out here by following parameters
- Branch – Selecting the branch in which an employee is working
- From date – Selecting the date range
- Select Employee – Selecting the employee name from the list.
The single option attendance list will contain the below-mentioned fields
- Reference Number: Reference number with respect to employee
- Name: Employee name
- In Time: Mark time in which employee punch in to work
- Out Time: Mark the time in which employee punch out from work
- To date: The date range
How to list of Single option in attendance:
Click on master -> Click on attendance -> click on single option -> enter the fields in time while check in and out time while check out -> Click on the save option under action.
2. Bulk Option
The attendance for one or more employees which they don’t have the access to the platform will be entered here by an official of the organization.
The attendance details of one particular employee can be listed out here by following parameters
- Branch – Selecting the branch in which employee is working
- From date – Selecting the date range
- Select project – Selecting the project list which employees is working
- In Time: Mark time in which employee punch in to working
- Out Time: Mark the time in which employee punch out from work
- To date: The date range
How to add of Bulk option in attendance:
Click on master -> Click on attendance -> click on bulk option -> enter the fields in time while check in and out time while check out -> Click on the assign all option.
3. Base User Option
This functionality will list out the attendance marking of a particular user who logged in to the application with their respective username and password.
The attendance details of one particular employee can be listed out here by following parameters
- Branch – branch in which employee is working
- From date – Selecting the date range
The Base user option attendance list will contains the below mentioned fields
- Reference Number: Reference number with respect to employee
- Name: Employee name
- In Time: Mark time in which employee punch into work
- Out Time: Mark the time in which employee punch out from work
To date: The date range
How to add base user option in attendance:
Click on master -> Click on attendance ->click on base user option -> enter the fields in time while check in and out time while checking out -> Click on the save option under action.
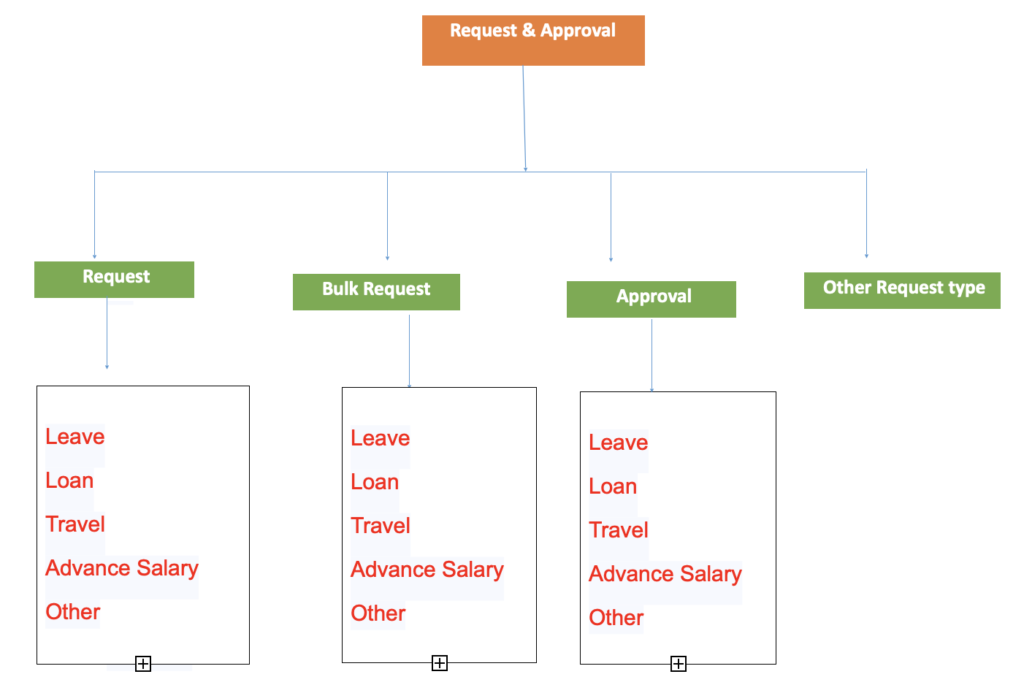
Request and Approval
Request and Approval Are the Areas Which The Employee Can Generate A Request On The Basis Of The Criteria And Categories To The Respected Person Of Contact And The Also The Employee Can Know The Status Generated Request In The Approval Section The Request And Approval Consist Of The Following Modules:
- Leave: This Is The Functionality Which The Employee Can Generate The Request For Granting Permission For Leave. Search and filter option is also there in this functionality for easy access to specific data
| Mandatory Fields | Descriptions |
| Leave Type | The Categories Of Leave Like Sick Leave, Casual Leave And Other Prevailing Types Of Leave In The Organization |
| Choose Date | The Date Range Which The Employee Is Apply For Leave |
| Reporting To | The Reporting Manager Or Person Who Needs To Approve The Leave |
| Reason | Providing The Reason For Taking The Leave By Employee |
How To Do Leave Request:
Click On Request And Approval -> Click On Request -> Click On Leave Request -> Add New -> Enter The Mandatory Filed -> Send
1. Loan
This Is The Functionality Where The Employee Can Request For Gaining Loan Amount
| Mandatory Fields | Descriptions |
| Request Date | The Date In Which The Request Is Being Made |
| Loan Amount | The Amount In Which The Employee Request For |
| Reporting To | The Reporting Manager Or Person Who Needs To Approve The Loan |
| Description | Providing The Description For Taking The Loan By Employee |
How To Do Loan Request:
Click On Request And Approval -> Click On Request -> Click On Loan Request -> Add New -> Enter The Mandatory Filed -> Send
2. Travel
This Is The Functionality Where The Employee Can Request For Travel To Specific Location
| Mandatory Fields | Descriptions |
| Travel Date | The Date In Which The Employee Travelled |
| Purpose Of Visit | Noting The Purpose Whether Is Official Or Not |
| Place | The Place Where The Employee Is Travelling |
| Travel Mode | The Way In Which The Employee Travelled Whether It’s On Public Or Private Commute |
| Arrangement Type | |
| Expected Budget | Amount Spend Or About To Spend On That Travel |
| Reporting To | The Reporting Manager Or Person Who Needs To Approve The Travel Request |
| Reason | The Reason For Travel |
| Approval Request | This Is The Area Where The Employee Provide The Actual Budget Incurred On The Trip And Raise The Request Again |
How To Do Travel Request:
Click On Request And Approval -> Click On Request -> Click On Travel Request -> Add New -> Enter The Mandatory Filed -> Send
3. Advance Salary
This Is The Functionality Where The Employee Can Request For Taking Salary Advance
| Mandatory Fields | Descriptions |
| Request Date | The Date In Which The Request Is Being Made |
| Amount | Amount That Is Requested For Salary Advance By The Employee |
| Reporting To | The Reporting Manager Or Person Who Needs To Approve The Travel Request |
| Reason | The Reason For Travel |
| Non-Mandatory Fields | |
| Description | Any Description About That If Needed |
How To Do Advance Salary Request:
Click On Request And Approval -> Click On Request -> Click On Advance Salary Request -> Add New -> Enter The Mandatory Filed -> Send
4. Other Request
If The Employee Needs To Request Other Than The Request Stated Above Can Be Done Through This Functionality.
| Mandatory Fields | Descriptions |
| Request Date | The Date In Which The Request Is Being Made |
| Reporting To | The Reporting Manager Or Person Who Needs To Approve The Travel Request |
| Other Request Type | Can Select The Other Request Type Which Is Being Created In Settings |
| Reason | The Reason For The Request |
| Non-Mandatory Fields | |
| Upload Documents | Upload Any Documents If Necessary |
How To Do Other Request:
Click On Request And Approval -> Click On Request -> Click On Other Request -> Add New -> Enter The Mandatory Filed -> Send
Bulk Request
1. Leave
This Is The Functionality Which The Employer Can Generate Request From One Or More Employee Who Doesn’t Have The Access To The Software Like Labors And Other Related Staffs For Granting Permission For Leave.
| Mandatory Fields | Descriptions |
| Select Branch | The Branch In Which The Employee Is Working |
| Leave Type | The Categories Of Leave Like Sick Leave, Casual Leave And Other Prevailing Types Of Leave In The Organization |
| Select Employee | The Select Employee To Get Details About The Request |
| Choose Date | The Date Range Which The Employee Is Apply For Leave |
| Reporting To | The Reporting Manager Or Person Who Needs To Approve The Leave |
| Reason | Providing The Reason For Taking The Leave By Employee |
How To Do Leave Request In Bulk Request:
Click On Request And Approval -> Click On Bulk Request -> Click On Leave Request -> Add New -> Enter The Mandatory Filed -> Save
2. Loan
This Is The Functionality Where The Employee Can Bulk Request For Gaining Loan Amount
| Mandatory Fields | Descriptions |
| Select Branch | The Branch In Which The Employee Is Working |
| Select Employee | The Select Employee To Get Details About The Request |
| Request Date | The Date In Which The Request Is Made |
| Loan Amount | The Amount In Which The Employee Request For |
| Reporting To | The Reporting Manager Or Person Who Needs To Approve The Leave |
| Description | Provide The Description Related To That |
How To Do Loan Request In Bulk Request:
Click On Request And Approval -> Click On Bulk Request -> Click On Loan Request -> Add New -> Enter The Mandatory Filed -> Save
3. Travel
This Is The Functionality Where The Employer Can Check The Request For Travel Of Labors To Specific Location
| Mandatory Fields | Descriptions |
| Select Branch | The Branch In Which The Employee Is Working |
| Select Employee | The Select Employee To Get Details About The Request |
| Request Date | The Date In Which The Request Is Made |
| Purpose Of Visit | Noting The Purpose Whether Is Official Or Not |
| Place | The Place Where The Employee Is Travelling |
| Travel Mode | The Way In Which The Employee Travelled Whether It’s On Public Or Private Commute |
| Arrangement Type | |
| Expected Budget | Amount Spend Or About To Spend On That Travel |
| Reporting To | The Reporting Manager Or Person Who Needs To Approve The Travel Request |
| Reason | The Reason For Travel |
| Non-Mandatory Fields | |
| Upload Documents | Upload Any Documents If Necessary |
| Actual Budget | Providing The Actual Expense Incurred |
How To Do Travel Request In Bulk Request:
Click On Request And Approval -> Click On Bulk Request -> Click On Travel Request -> Add New -> Enter The Mandatory Filed -> Save
4. Advance Salary
This Is The Functionality Where The Employer Can Generate Advance Salary Request From One Or More Employee Who Doesn’t Have The Access To The Software Like Labors And Other Related Staffs For Granting Permission.
| Mandatory Fields | Descriptions |
| Select Branch | The Branch In Which The Employee Is Working |
| Select Employee | The Select Employee To Get Details About The Request |
| Request Date | The Date In Which The Request Is Made |
| Amount | The Requested Amount For Advance Salary |
| Reporting To | The Reporting Manager Or Person Who Needs To Approve The Request |
| Reason | Providing The Reason For Taking The Leave By Employee |
| Non-Mandatory Fields | |
| Description | Add Any Description If Needed |
How To Do Advance Salary Request In Bulk Request:
Click On Request And Approval -> Click On Bulk Request -> Click On Advance Salary Request -> Add New -> Enter The Mandatory Filed -> Save
5. Other Request
This Is The Functionality Where The Employer Can Generate Any Other Request Apart From This From One Or More Employee Who Doesn’t Have The Access To The Software Like Labors And Other Related Staffs.
| Mandatory Fields | Descriptions |
| Select Branch | Select The Desired Branch |
| Select Employee | Select The Desired Employee |
| Request Date | The Date In Which The Request Is Being Made |
| Reporting To | The Reporting Manager Or Person Who Needs To Approve The Travel Request |
| Other Request Type | Can Select The Other Request Type Which Is Being Created In Settings |
| Reason | The Reason For The Request |
| Non-Mandatory Fields | |
| Upload Documents | Upload Any Documents If Necessary |
How To Do Other Request In Bulk Request :
Click On Request And Approval -> Click On Bulk Request -> Click On Other Request -> Add New -> Enter The Mandatory Filed -> Save
Approval
This The Module In Which The Person Concern Confirm Or Reject The Request That Already Been Made.
Leave Approval
Approving The Leave Request That Being Already Made.
How To Approve Or Deny Leave Request:
Click On Request And Approval -> Click On Approval -> Click On Leave -> Click On Icon Under Action -> Click Approve Or Reject
Loan Approval
Approving The Loan Request That Being Already Made.
How To Approve Or Deny Leave Request:
Click On Request And Approval -> Click On Approval -> Click On Loan -> Click On Icon Under Action -> Click Approve Or Reject
Travel Approval
Approving The Travel Request That Being Already Made.
How To Approve Or Deny Leave Request:
Click On Request And Approval -> Click On Approval -> Click On Travel -> Click On Icon Under Action -> Click Approve Or Reject.
Advance Salary Approval
Approving The Advance Salary Request That Being Already Made.
How To Approve Or Deny Leave Request:
Click On Request And Approval -> Click On Approval -> Click On Advance Salary -> Click On Icon Under Action -> Click Approve Or Reject
Other Approval
Approving The Travel Request That Being Already Made.
How To Approve Or Deny Leave Request:
Click On Request And Approval -> Click On Approval -> Click On Travel -> Click On Icon Under Action -> Click Approve Or Reject
Overview
Payroll Is The List Of Organizations Employees And The Salary Or Amount Needs To Pay To The Employees By The Organization. The PayRoll Usually Generated Toward The End Of Every Month.
Options For Generating Payroll
- Month: Month The Payroll Needs To Be Generated
- Year: The Concern Year In Which The Payroll Needs To Be Generated
- Select Project: If The Payroll To Be Generated For The Employees Worked For a Specific Project
- Search Employee: The Payroll Of Individual Employees Also Can Be Generated
How To Generate Payroll:
Click On Payroll -> Click On Payroll Monthly -> Select The Options Of Payroll Generation -> Click On Generate All.
Overview
This functionality will provide information regarding the suppliers incorporated within the organization and contains the relevant data about them.
Supplier Profile
This functionality contains the basic profiling details of the supplier for better understanding.
| Mandatory Fields | Descriptions |
| Select Branch | The user can select the particular branch of the organization |
| Shift Name | Provide the shift name whether its Day or Noon or Night section |
| Shift Total Hours | The user can provide the working Hours of each shifts |
| Non-Mandatory Fields | |
| Mobile | Alternative mobile number |
| Company Email | The company email ID of supplier |
| Contact Email | The contact Email Id of the supplier |
| Contact Person | The contact person of the supplier |
| Select Country | Picking the country which has been already added in the settings module |
| Currency | Picking the currency which has been already added in the settings module |
| Address | Providing the address of the supplier |
| Description | Providing description if any |
How to add Supplier:
Click on supplier -> click on supplier profile -> Click on add new -> fill the mandatory details -> save.
Overview
Report Section Gives The Organization The General And Focused Reports Related To Human Resources
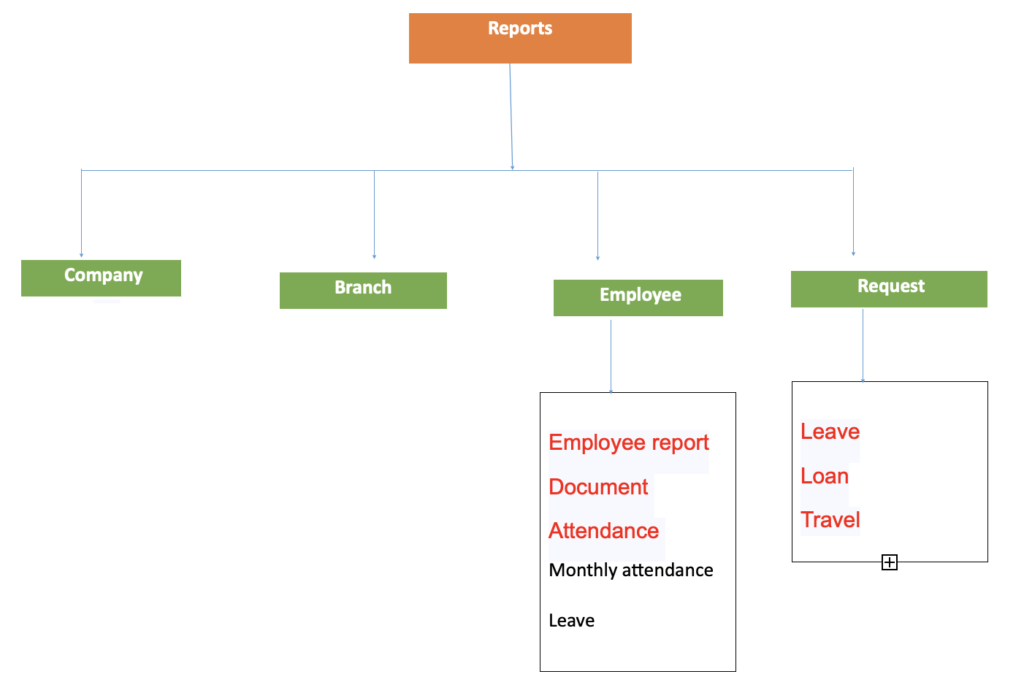
Company Document
This Functionality Will Generate The Reports Related To Company Documents. Which Can Be Generated On The Basis Of Options Like
- Status: Whether It’s Expired Or Not
- Issue Date: On The Basis Of Issued Date Of The Document
- Expiry : On The Basis Of Expiry Date Of The Document
How To Download The Company Report Pdf :
Click On Reports -> Click On Company -> Select The Options In Which The Reports Needs To Generated -> Click On The Download Report Option
How To Export To Excel The Company Report :
Click On Reports -> Click On Company -> Select The Options In Which The Reports Needs To Generated -> Click On The Export To Excel Option.
Branch Document
This Functionality Will Generate The Reports Related To Branch Documents. Which Can Be Generated On The Basis Of Options Like
- Status: Whether It’s Expired Or Not
- Issue Date Range: On The Basis Of Issued Date Range Of The Document
- Expiry Date Range: On The Basis Of Expiry Date Range Of The Document
How To Download The Branch Document Report Pdf :
Click On Reports -> Click On Branch -> Select The Options In Which The Reports Needs To Generated -> Click On The Download Report Option
How To Export To Excel The Branch Document Report :
Click On Reports -> Click On Branch -> Select The Options In Which The Reports Needs To Generated -> Click On The Export To Excel Option.
Employee Reports
This Functionality Can Generate Basic Reports Of The Employee On The Basis Of These Criteria’s
- Search By Branch: The Branch In Which The Employee Is Working
- Designation: The Designation Of Employee
- Employee Category: The Category In Which Employee Belongs To.
- Office Shifts: The Shits In Which The Employee Is Working
- Employee: On The Basis Of Employee Name
- Reference Number: On The Basis Of The Reference Number Provided To Employee
- Date Of Join: The Date In Which Employee Joined The Organization
- Type: Whether The Employee Is In Hourly Salary Of Monthly Salary
- Status: Whether The Employee Is Authorized By The Person Concern Or Unauthorized
- Employee Exit:
How To Download The Employee Report Pdf :
Click On Reports -> Click On Employee -> Click On Employee Report -> Select The Options In Which The Reports Needs To Generated -> Click On The Download Report Option
How To Export To Excel The Employee Report :
Click On Reports -> Click On Employee -> Click On Employee Report -> Select The Options In Which The Reports Needs To Generated -> Click On The Export To Excel Option.
Employee Document Reports
This Functionality Will Generates Reports Based On Employee Documents Based On These Parameters
- Status: Whether It’s Expired Or Not
- Issue Date Range: On The Basis Of Issued Date Range Of The Document
- Expiry Date Range: On The Basis Of Expiry Date Range Of The Document
How To View The Employee Document Report Pdf :
Click On Reports -> Click On Employee -> Click On Employee Document Report -> Select The Options In Which The Reports Needs To Generated -> Click On The Icon Under Preview Option
Employee Attendance Reports
This Functionality Generates Reports Of Employee Attendance Containing this Information.
- Employee Name: The Name Of The Employe
- In Time: The Time In Which Employee Signed In To Work
- Out Time: The Time In Which Employee Signed Out From Work
- Project: Specific Project The Employee Working On
- Over Time Hours: Whether The Employee Took Any Additional Hours For Work Rather Than The Defined Working Time
- Total Work Time Hours: The total working time of the employee
The attendance report can be generated on the basis of
- Date wise: Generating on the basis of particular date
- Month and year: On the basis of particular month and year
Request Reports
Reports Based On The Request Made By The Employees In The Organization
Travel Request Reports
This Functionality Will Generate Travel Request Made By The Employees On The Basis Of These Criteria’s
- Search By Branch: The Branch In Which The Travel Request Being Made
- Request Number: The Request Number Of The Made Request
- Employee: The Employee Name Whom The Request has Proceeded
- Reporting To: The Reporting Manager Of The Request
- Start Date: The Date In Which The Commutation Happened
- End Time: The Date In Which Commutation Ended
- Status: Whether The Request Is Applied, Approved Or Rejected.
How To Download The Travel Request Report Pdf :
Click On Reports -> Click On Request -> Click On Travel Request -> Select The Options In Which The Reports Needs To Generated -> Click On The Download Report Option
How To Export To Excel The Travel Request Report :
Click On Reports -> Click On Request -> Click On Travel Request -> Select The Options In Which The Reports Needs To Generated -> Click On The Export To Excel Option.
Loan Request Reports
This Functionality Will Generate Loan Request Made By The Employees On The Basis Of These Criteria’s
- Search By Branch: The Branch In Which The Travel Request Being Made
- Request Number: The Request Number Of The Made Request
- Employee: The Employee Name Whom The Request has Proceeded
- Reporting To: The Reporting Manager Of The Request
- Request: The Date In Which The Request Being Made
- Status: Whether The Request Is Applied, Approved Or Rejected.
How To Download The Loan Request Report Pdf :
Click On Reports -> Click On Request -> Click On Travel Request -> Select The Options In Which The Reports Needs To Generated -> Click On The Download Report Option
How To Export To Excel The Loan Request Report :
Click On Reports -> Click On Request -> Click On Travel Request -> Select The Options In Which The Reports Needs To Generated -> Click On The Export To Excel Option.
Leave Request Reports
This Functionality Will Generate Leave Request Made By The Employees On The Basis Of These Criteria’s
- Search By Branch: The Branch In Which The Travel Request Being Made
- Request Number: The Request Number Of The Made Request
- Employee: The Employee Name Whom The Request has Proceeded
- Reporting To: The Reporting Manager Of The Request
- Leave Type: On The Basis Of Category Of Leave Whether Its Casual, Sick. Loss Of Pay Etc.
- Start Date: The Date In Which The Leave Taken
- End Time: The Date In Which Leave Ended.
- Status: Whether The Request Is Applied, Approved Or Rejected.
How To Download The Leave Request Report Pdf :
Click On Reports -> Click On Request -> Click On Leave Request -> Select The Options In Which The Reports Needs To Generated -> Click On The Download Report Option
How To Export To Excel The Leave Request Report :
Click On Reports -> Click On Request -> Click On Leave Request -> Select The Options In Which The Reports Needs To Generated -> Click On The Export To Excel Option.
Overview
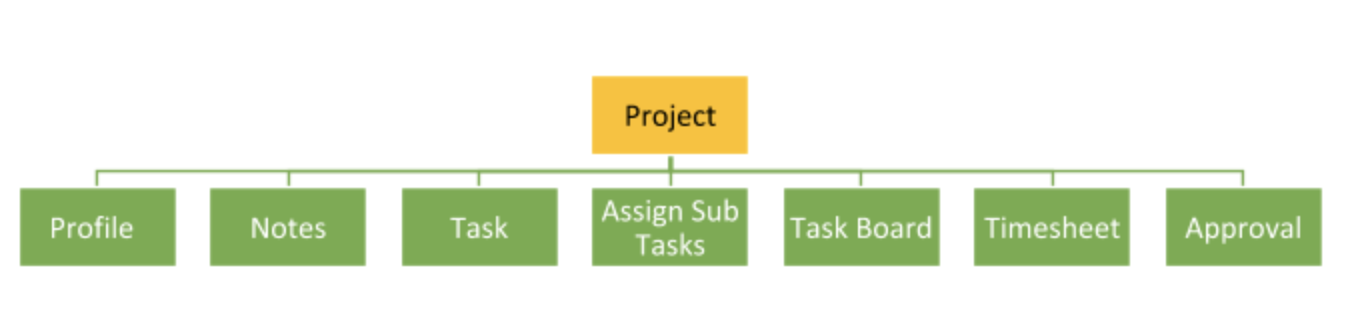
Profile
This gives the relevant and basic information regarding the project that the organization deals with in order to get prior understanding of it.
| Mandatory Fields | DESCRIPTION |
| Branch* | The branch in which project is handling |
| Project Name* | The name of the project |
| Customer Name* | The customer for whom the project needs to deliver |
| Project Number* | The specified number of the project put by the organization |
| Start Date* | The fixed date in which the project is starting |
| Approx Delivery Date* | The anticipated delivery date in which the project will be delivered |
| Budget Hours* | |
| Project Priority* | Whether the project belongs to high or low priority can be fixed here |
| Project Status* | The current progress of project |
| Description* | Providing other descriptions related to project |
| Non Mandatory Fields: | |
| Project Type | Is the project is billable every month or its flat single payment |
| Select Currency | The currency of project billing amount |
| Estimated Cost | Estimated cost incurred on the project |
| Exchange Rate | The exchange rate according to currency conversions |
| Select Project Expense | Selecting the types of expenses incurred while doing the project |
| Select Project Leader | The project manager or leader who deals with the work |
| Project Summary | Overall summary of the project can be added here |
| Reference Number | Providing any reference number for the project identification |
| phase Number | Providing phase number if any |
How to add project profile :
Click on master 🡪 click on project 🡪 click on profile 🡪 provide the mandatory fields 🡪 save.
Assign Employees to Project Once Created:
Once the project profile is created the next step is to assign the employees to the specific project manager or person concern.
The search criteria in assigned employee done by these criteria
–> Selecting Branch – Branch in which the project is happening
–> Selecting Employee – selecting particular employee working on the project
–> Selecting Recruiter – Selecting the recruiter where the employee comes under that
–> Assigned Options – There are 3 things comes under this 1. All employees under the project 2. Assigned employees to the particular project 3. Not assigned employees
| Mandatory Fields |
DESCRIPTION |
| Cost Type | Whether is payment is hourly or monthly basis |
| Cost | The cost incurred for the employee |
| Date Period | The date range of the employee working on the project |
| Allow multiple | Allow for multiple entry |
| Non Mandatory Fields: | |
| Overtime Cost | The cost incurred when the employee worked over time than the preferred working hour |
How to assign work to employees in the project:
Click on master -> click on project -> click on profile -> click on the plus icon under assign employee option -> fill the mandatory fields -> save.
Uploading Document in Project Profile:
If any documents related to the project can be uploaded in this function.
| Mandatory Fields |
DESCRIPTION |
| Document Number* | The concern number of the document |
| Document Name* | The name of the document which is uploading |
| Upload* | Uploading the documents by selecting the upload option |
| Non Mandatory Fields: | |
| Description | Provide description if any |
How to upload documents in project:
Click on master -> click on project -> click on profile -> click on the upload icon under upload option -> fill the mandatory fields -> save.
Adding Permission to Employees For Particular Employees:
This is the option where the project manager can assign permission to a particular employee who works in the project.
The permission criteria are:
— Selecting the employee
How to add permission in the project:
Click on master -> click on the project -> click on profile -> click on the permission icon under permission option -> fill the mandatory fields -> save.
Project Note
This is the functionality where the user can add any notes or descriptions regarding the project that’s organization works on.
| Mandatory Fields | DESCRIPTION |
| Select Project | Selecting the project from the entered project profile list |
| Subject | Providing proper subject for the project Note |
| Note | Provide notes regarding the project |
How to add project note :
Click on master -> click on the project -> click on project note -> provide the mandatory fields – save.
Task
This is the functionality where the user can add tasks under the project which has been already created and provide the details based on that.
| Mandatory Fields | Description |
| Project* | Selecting the project already created |
| Task Name* | Providing the task name for the correspondent project |
| Start Date* | The date in which project is starting |
| Date of Completion* | The expected date of completion of the project |
| Billing Status* | If its billable not billable or a mix of both |
| Status* | The status of the project whether its completed on going, cancelled or not |
| Time Entry Required | Whether the working time need to be entered |
| Description* | Provide any description regarding the project |
| Non Mandatory Fields | |
| Estimated Hours | The estimated hours of project completion |
| Currency | The currency in which the project is billed |
| Exchange Rate | The exchange rate value of currency |
| Estimated Cost | Estimated cost for the budget |
| Per Day Expense Cost | The expected per day cost incurred on the project |
| Per Day Charge Rate | The expected per day charge to be paid for the project development |
| Per Day Expense Charge Rate | The expected per day expense charge rate incurred |
How to add a task:
Click on master -> click on the project -> click on task -> provide the mandatory fields -> save.
Sub Tasks
Sub tasks are the activities assigned to an employee by the person concern under the tasks. In this functionality, user can enter relevant data and assign the sub-tasks accordingly.
| Mandatory Fields | Description |
| Task* | Selecting the task which is already created |
| Sub Task* | Creating sub task under the task which is created |
| Start Date* | The starting date of the sub task |
| Date of Completion* | The expected completion date of the sub task |
| Estimated Hours* | Estimated hours for project task completion |
| Billing Status* | If its billable not billable or a mix of both |
| Assigned By* | The person concern assigned the sub task to the employee |
| Time Entry Required | Whether the working time need to be entered |
| Description* | Provide any description regarding the project |
| Non Mandatory | |
| Select Currency | The currency chosen for sub task work |
| Exchange Rate | The exchange rate value of currency |
| Estimated Cost | Estimated cost for the budget |
| Total Time Taken | Total time taken for sub task completion |
| Per Day Expense Cost | The expected per day charge to be paid for the project development |
| Per Day Charge Rate | The expected per day expense charge rate incurred |
| Per Day Expense Charge Rate | The exchange rate value of currency |
How to add a task:
Click on master -> click on project -> click on sub task -> provide the mandatory fields -> click on assign.
Task Board
This gives the representation of the project tasks and subtask status and progress on the basis of time and date. Through representation the project lead can get the information regarding the current status of the project how much it is completed and which all are the tasks and sub tasks currently working whole lot of information can be easily gained through this functionality.
How to navigate to the task board:
Click on master -> click on project -> click on task board ( You can see the task board details listed underneath)
Timesheet
Timesheet generates the logging in of each member to the project thereby tracking the working hours of each team member working on the assigned tasks. This helps for tracking the billing of the project and keeping a track on the pace of the project. The timesheet will be fixed based on the client requirement in how many days the project will be delivered and the hours taken for completion of the particular project can also be recorded using this. Timesheet is generally created by the employees working on a specific project
How to navigate to timesheet:
Click on master -> click on project -> click on timesheet ( You can see the time sheet details listed underneath)
Timesheet Approval
The finalized timesheet on the basis of time and budget added by the employee need to be approved by the project manager, in order to find any issues or need some rectification for the same.
How to approve all timesheet:
Click on master 🡪 click on project 🡪 click on approval🡪 click on accept all for approving all
How to approve individual timesheet:
Click on master 🡪 click on project 🡪 click on approval🡪 click on accept icon under action menu
How to reject all timesheet:
Click on master -> click on project -> click on approval -> click on reject all for total rejection
How to reject individual timesheet:
Click on master -> click on project -> click on approval -> click on reject icon under action menu
Overview
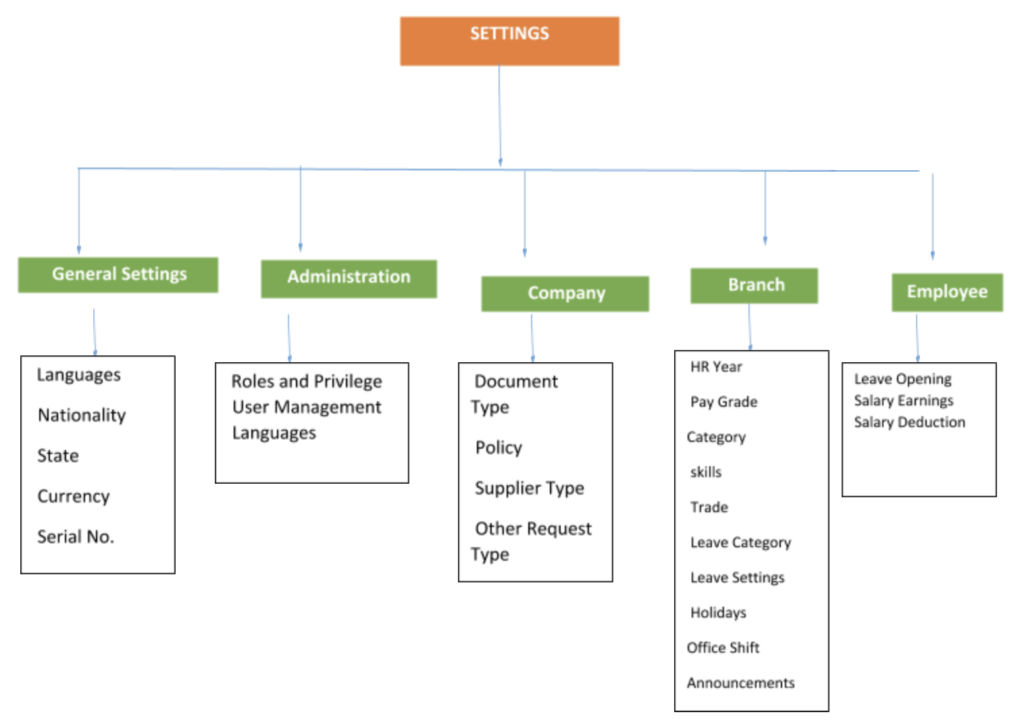
General Settings
Language Settings
The language section is the functionality where the user can add the languages followed or prevailing in the organization.
| Non Mandatory fields | Description |
| Key | |
| Value |
How to add languages:
Click on settings -> Click on general settings -> click on languages -> click on add new -> enter the mandatory fields -> save.
Nationality
This functionality is generally used to add the nationality as well as in all modules in the software.
| Mandatory | Description |
| Nationality | The field which can be used to add the nationalities of the employees in the organization as well as in all other modules of the software. |
How to add the nationality:
Click on the settings -> Select general settings -> Click on nationality -> Add new -> add the mandatory details -> Save
State
State field is considering as the sub category to the nationality where the organization can add the state of needy in every modules of the software as mentioned in nationality.
| Mandatory | Description |
| Select Country | This field is to fill the country where the employees belong to and also it will be helpful to sort the states easily. |
| State Name | The state name is the field to fill the states and also can be used in all other modules as mentioned |
How to add state:
Click on settings -> select general settings -> click on state -> Add New -> Fill the mandatory details -> Save.
Currency
This is the field to enter the currency of different countries which has a relationship with the organization.
| Mandatory | Description |
| Currency name | Since different countries have different currencies, name too may vary. This field is to enter the currency name and name of countries for easiness in business functions |
| symbol | Currencies of different countries can have different symbolic representations .This field is to enter such symbols to identify that which currency belongs to which country |
| Exchange rate | The currency value for the purpose of conversion to another may varies in every country. this can happen day by day. this field is to enter the proper exchange rate of currency on a daily basis. |
How to add currency:
Click on settings -> Select general settings -> Click on currency -> Add new Currency -> Add required details -> Save
Serial Number
Serial numbers are very important to track the details regarding every single area of operations followed in the organization. The different area has a different serial number for distinguishing.
| Non mandatory | Description |
| Type | There are different types of serial numbers are there. They can either be strictly numerical, letters or any symbols. this is to identify the type of entering serial no |
| Prefix | This field will specify the prefix in front of each serial number. |
| Last no | Preferred last number of serial number |
| length | This field shows the length of the serial number of each product |
How to add a serial number:
Click on settings -> select general settings -> Click on serial number -> Add serial numbers as per requirements -> Save.
Administration
This functionality includes the settings based on an administration level that purely concentrate on the HR process.
1. Roles and Privileges
This is the functionality to provide a specific role according to the organizational working structure.
2. User Management
This the functionality where the admin can create users for operating this software.
| Non-mandatory | Description |
| First Name | The first name of user |
| Last Name | The last name of the user |
| The specific email ID for the user | |
| Mobile | Mobile number of user |
| Password | Set the password for user |
| Confirm Password | Confirming the set password |
How to add user management:
Click on settings -> Click on administration settings -> click on user management -> enter the fields -> save.
Company
This is the functionality where we can add the basic process details and other relevant information comes under the company.
1. Document Type
This is the functionality to add documents comes under each master.
| Mandatory Fields | Description |
| Selecting Type | Comes under which module Company, Branch, Employer, Supplier etc. |
| Name | The Document name |
| Non-Mandatory Fields | |
| Description | Adding description if necessary |
How to add Document Type:
Click on settings -> Click on Company settings -> Click on document type -> click on add new -> fill the mandatory fields -> save.
2. Company Policy
In this functionality the company can new policies and start and end time of that. Each companies have their own policies like HR policies, leave policies, Maintenance policies, Onboarding polices etc. which they follow strictly in the organization. so through this they can easily create and track the policy related process.
| Mandatory Fields | Description |
| Selecting Company | Selecting the company if the software operates on one or more companies and specifically set the policies for that. |
| Policy Name | The policy name of policy which is being implemented |
| Start Date | The official declaration of the policy to be followed by the employees |
| Description | Entering the important Information regarding the declared policy |
| Non-Mandatory Fields | |
| Expiry Date | If the policy is for a particular point of time then we can set the expiry date |
Adding Company Policy:
Click on settings -> Click on Company settings -> Click on company policy -> click on add new -> fill the mandatory fields -> save
3. Supplier Type
This functionality add and includes information related to type of suppliers in the organization whether they are local suppliers or international like wise.
| Mandatory Fields | Description |
| Supplier Type | Provide a description of the supplier |
Adding Supplier Type:
Click on settings -> Click on Company settings -> Click on supplier type -> click on add new -> fill the mandatory fields -> save
4. Other Request Type
This functionality add and includes information related to type of request other than those mentioned in the requests module.
| Mandatory Fields | Description |
| Type Name | Providing the name of the request type |
Adding Supplier Type:
Click on settings -> Click on Company settings -> Click on Other request type -> click on add new -> fill the mandatory fields -> save.
Branch
This is the functionality where we can add the basic process details and other relevant information comes under the branch of an organization.
1. HR year
This is the functionality where the organization can enter the HR year in order to specify the HR activities and programs comes under which year.
| Mandatory Fields | Descriptions |
| Start Date | Entering the starting date of the HR year |
| End Date | Entering the ending date of HR year |
| Is current | Is the year followed is current year |
How to add HR year:
Click on settings -> Click on branch settings -> Click on HR year -> Click on add new -> Add the mandatory fields -> Tick if the year is currently following -> Save.
2. Paygrade
This is considered as the salary given to employees in an organization of different designations .
| Mandatory | Description |
| Select designation | This is the field used to enter the designations of different employees in the organization . |
| Grade | The jobs in an organization varies according to the designations provided for the employees.thus the grade of salary also changes.This field helps to assign those grades easily |
| Amount | Amount is the salary range that provided for each employee as per the designation of an organization. This is a field which we can enter the amount details that paid to employees as the salary |
| Non mandatory | |
| Types | |
| HS [Hourly salary] | The field used to enter the data related with the salary which is given to a employee per hour |
| BS [basic salary] | Similar to the HS,BS is the basic salary provided ,and which can be enter in this field |
| Leave reduction amount | This is the field to enter the salary that has been reduced from each employee belongs to the organization when they gone for leave |
| Minimal deduction amount | This field is to enter the minimal amount deduction . |
How to add paygrade
Click on settings -> Select the branch -> Select the paygrade -> Add the required datas -> Save
3. Category:
This is to categorise the employees .Here the organization can classify employees in different categories such as part time ,full time or in hourly basis.
| Mandatory | Description |
| Category name | This is the field where the organization can classify the employees to different categories such as part time , full time , hourly basis and so on as mentioned above. |
How to add a category:
Click on settings -> Select the branch -> Click on the category -> Add the required categories -> Save.
4. Skills:
This field can include various skills that an employee may have in the organization. the skills can be different and this field helps to easily identify particular employees that can do specific jobs as per their skills mentioned.
| Mandatory | Description |
| Skills | This is a field which the organization can add skills of workers such as sales , engineering, programming and so on. |
How to add skills:
Click on settings -> select the branch -> click on the skills -> Add required data -> save.
5. Trade:
This is the field where the trade details of an organization that can be added. Since there can happen both external and internal trade, it will be easy to sort this using trade field.
| Mandatory | Description |
| Trade | This field is to enter the data related to the trades that happen in an organizations such as international and domestic. |
How to add trade:
Click on the settings -> select branch -> click on the trade -> add the details -> save.
6. Leave category :
This field helps to categorise the leaves applied by each employee in an organization. Duration of leaves they applied for ( which includes the no: of hours or days ),what kind of leave is required can be mentioned.
| Mandatory | Description |
| Leave name | This field mention which kind of leave the employee applied for. |
| Non mandatory | |
| branch | This field may categorise the branch which the employee applied for the leave belongs to. |
| Short name |
How to add leave category :
Click on settings -> Select the branch -> Click on leave category -> Add the required details -> save.
7. Leave settings :
This field can provide the options for the types of leave employees may take .
| Mandatory | Description |
| HR Year | Selecting the HR year |
| Select the leave category | This is the field to enter the category of leave that applied by the employee |
| Leave yearly numbers | This is the field for entering number of leaves per year |
| Non mandatory | |
| Maximum allowed leave | This is to enter the maximum number of leave that is allowed to each employee |
| Is leave encash | To enter the amount of money received in a period of leave which is not availed by the employee |
| Is leave carry forward | To enter the leaves that carry forward by the employee which haven’t taken in an year to the next year . |
How to add leave settings :
Click on the settings -> select the branch -> click on leave settings -> Add the required details -> save.
8. Holidays:
This menu is to set the holidays followed by the company. The organization can set the holidays providing the name and date range that need to be reflected altogether in the company or on selected branch and also can select under which HR year the holidays are incorporated.
| Mandatory Fields | Descriptions |
| Branch | Selecting the branch |
| HR Year | Selecting the HR year followed |
| Event Name | Add the holiday or event name here |
| Choose Date | Choose the date range |
| Description | Providing the description if any. |
How to add holidays year:
Click on settings -> click on branch settings -> click on holidays -> click on add new -> add the mandatory fields -> save.
9. Office Shifts:
Most of the organizations having office shift timings where the employees will be working on the basis of the defined shift timings by the organization. Through this functionality the user can create the timings of the branch providing the shift name and hours which can be entered in each day during the week this will automatically reflect to the employees working under each shits hence helps to track accurately which employee is working in which shift.
| Mandatory Fields | Descriptions |
| Select Branch | The user can select the particular branch of the organization |
| Shift Name | Provide the shift name whether its Day or Noon or Night section |
| Shift Total Hours | The user can provide the working Hours of each shifts |
How to add Office Shifts:
Click on master -> click on branch -> Click on office shifts -> Click on add new button -> Fill the mandatory in basic details -> Provide In time and out the time of each shift on the basis of days -> Save
10. Announcements
This area helps to provide important announcements or happenings in the organization which can be added branch wise. The user can select the company or specific branch and departments or specific departments based on the announcements. This helps the employee to gets notified with the announcements declared by the company.
| Mandatory Fields | Descriptions |
| Select Branch | The user can select the particular branch of the organization |
| Title | Provide the title name for the announcements |
| Choose Date | Pick the date range for announcements |
| Select Department | Select for all departments or for a specific department |
| Description | Providing description for the announcements |
| Non-Mandatory Fields | |
| Summary | Provide summary if any |
Employee
This functionality contains and add the information settings that mostly connects with employee and its process.
1. Leave Opening
The opening leave balance of each year can be entered in this functionality of each employee. The user can add more than one entry on the same screen
| Mandatory Fields | Description |
| HR year | Providing the consecutive year of work |
| Select Employee | Selecting the employee name |
| Date | Selecting the date |
| Select Leave category | Selecting the leave category whether its casual leave ,sick leave likewise |
| Pending Leave | Entering the pending leave in category of leave which employee have. |
How to add Leave Opening:
Click on settings -> Click on employee settings -> Click on leave opening -> Enter the mandatory fields -> Save.
2. Salary Earnings settings
This is the functionality where the organization can add the data related to salary earnings to the employee which includes the allowances, incentives, bonus and other related ones. Here user can select the option based on the salary like hourly or basic. Once it entered which will be reflected in the transactions related with it.
| Mandatory Fields | Description |
| Earnings Name | Providing the description or name of earnings for employees |
| Type | Selecting on the basis of basic salary or hourly salary or not applicable |
| Non-Mandatory Fields | |
| Short Name | Providing short name if it contains |
How to add Salary earnings:
Click on settings -> Click on employee settings -> Click on salary earnings -> Enter the mandatory fields -> Save.
3. Salary Deduction
This is the functionality where the organization can enter the salary deduction types which includes advance salary, loss of pay and related things where the salary been reduced. Here they can choose the way in which the employee being paid is it an hourly based salary or basic salary. So through this the analysing of deductions becomes much easily and fast.
| Mandatory Fields | Description |
| Deduction Name | Providing the description or name of deductions for employees |
| Type | Selecting on the basis of basic salary or hourly salary or not applicable |
| Non-Mandatory Fields | |
| Short Name | Providing short name if it contains |
How to add Salary earnings:
Click on settings -> Click on employee settings -> Click on salary earnings -> Enter the mandatory fields -> Save.